Centre d'aide
Vous avez des questions sur nos guitares, vous souhaitez en savoir plus ou avez besoin d'une réparation ? Alors vous êtes au bon endroit !

Questions fréquemment posées
Beaucoup de questions, beaucoup de réponses. Votre question a peut-être déjà une réponse. Recherchez dans notre FAQ ci-dessous ou n'hésitez pas à parcourir les questions.
Informations générales 13
Puis-je acheter une guitare directement chez Lakewood ?
S’il n’y a pas de revendeur dans ta région et que tu n’as pas de contact local, tu peux acheter ta future guitare Lakewood directement chez nous, au prix de vente conseillé (PVC).
Si tu t’es déjà renseigné(e) sur nos guitares auprès d’un revendeur Lakewood, tu es tout de même le/la bienvenu(e) pour venir nous rendre visite, choisir ton instrument personnel dans notre grand showroom ou commander une guitare Customshop. Dans ce cas, le paiement se fera via ton revendeur Lakewood.
Quels magasins de musique vendent des guitares Lakewood ?
Puis-je fournir mon propre bois à Lakewood pour la fabrication d'une guitare ?
Comment est né le nom commercial « Lakewood »?
Où sont fabriquées les guitares Lakewood ?
Où puis-je enregistrer ma guitare ?
Où puis-je trouver le modèle et le numéro de série ?
 La description du modèle et le numéro de série figurent sur l'étiquette située à l'intérieur de la guitare, visible par le trou de son.
Que signifient les lettres et les chiffres des noms de modèles ?
Quand (en quelle année) ma guitare a-t-elle été fabriquée?
Les numéros de série peuvent être attribués à l'année de fabrication. En voici la répartition :
Numéro de série (de - à) / année de fabrication
195-461 / 1986
462-1150 / 1987
1151-1912 / 1988
1913-2707 / 1989
2708-3683 / 1990
3684-4847 / 1991
4848-5666 / 1992
5667-6464 / 1993
6465-8277 / 1994
8278-8722 / 1995
8723-9590 / 1996
9591-10129 / 1997
10130-10631 / 1998
10632-11151 / 1999
11152-11899 / 2000
11900-12702 / 2001
12703-13648 / 2002
13649-14629 / 2003
14630-15489 / 2004
15490-16327 / 2005
16328-17142 / 2006
17143-17938 / 2007
17939-18776 / 2008
18777-19626 / 2009
19627-20449 / 2010
20450-21383 / 2011
21384-22260 / 2012
22261-23316 / 2013
23317-24404 / 2014
24405-25414 / 2015
25415-26533 / 2016
26534-27705 / 2017
27706-28764 / 2018
28765-29975 / 2019
29976-31180 / 2020
31181 - 32397 / 2021
32398 - 33466 / 2022
33467 - 34776 / 2023
34777 - 36054 / 2024
36055 -
Quelle est la durée de la garantie Lakewood ?
Les conditions complètes de notre garantie sont disponibles ici..
Ma guitare a besoin d'être réparée. Comment dois-je procéder ?
Y a-t-il des visites d'usine à Lakewood ?
Une nouvelle guitare fait-elle des heureux ?
Problèmes et assistance 15
Réparez-vous aussi des guitares d’autres marques ?
Oui !
C’est justement la mission de notre Centre de Compétence Guitare.
Tu trouveras toutes les infos sur https://de.guitarhelp.eu/
Panne du système de capteur
Généralités
Le système L.R. Baggs Anthem se compose d’une unité de commande fixée à la table de la guitare dans la zone de la rosace à l’aide de trois pastilles adhésives élastiques.
Les éléments de commande comprennent le volume, le réglage du mélange du microphone, un inverseur de phase et un bouton de contrôle de la batterie avec un indicateur d’état à cinq niveaux.
Un capteur est positionné sous la selle du chevalet. Un microphone est fixé à l’intérieur de la table, près du chevalet, à l’aide de deux pastilles adhésives.
Les deux capteurs sont reliés à l’électronique par des câbles coaxiaux et des connecteurs jack de 2,5 mm. La prise de sortie du système se trouve dans le coin de l’éclisse, au niveau du talon de fond de la guitare.
Le câble entre l’électronique et la prise de sortie est monté sur l’électronique à l’aide d’un connecteur plat verrouillable et fixé à l’éclisse à l’aide de supports de câble. Les câbles de connexion des deux capteurs sont également fixés à la table et à l’éclisse.
La pile de 9 volts nécessaire à l’électronique est logée dans une pochette fixée au fond de la guitare avec une fermeture velcro et reliée à l’unité de commande par un câble.
Données techniques
Impédance de sortie : 620 Ohm
Consommation : 3,5 mA
Autonomie de la pile : env. 170 h (selon le type de pile)
Poids (incl. pile 9 V) : 162 g
Réponse en fréquence : ~60 – 250 Hz (capteur de chevalet), ~250 Hz – 20 kHz (microphone)
Problèmes connus
Prise de sortie
Contact instable provoquant une coupure momentanée du signal lors du mouvement du jack.
Ce défaut peut être causé par l’utilisation de connecteurs de mauvaise qualité dont le diamètre est inférieur à 6,35 mm.
Solution : Remplacer la prise avec son câble de connexion.
Capteur de chevalet
Volume inégal entre les cordes.
Solution : Il se peut que l’os de chevalet ait bougé ou qu’une particule se soit glissée dans la rainure. Détends les cordes, retire l’os de chevalet et souffle soigneusement dans la rainure.
Microphone
Aucun problème connu pour le moment.
Unité de commande
Des vibrations peuvent apparaître sur les éléments mobiles de l’électronique ou du boîtier.
Vibrations causées par les boutons de volume et de mixage.
Solution : Remplacement complet de l’unité de commande.
Défaut de l’inverseur de phase.
Solution : Remplacement complet de l’unité de commande.
Aucun signal audible.
Solution : L’électronique est hors service et doit être remplacée.
Questions
Puis-je réparer moi-même les dysfonctionnements du système L.R. Baggs ?
Réponse : Dans la plupart des cas, ce n’est pas possible. Merci de contacter : repairs@lakewood.de
The string action is uncomfortable
The curvature of the soundboard appears to be excessive
The curvature is naturally impacted by pull from the strings; flattens out slightly between the bridge and sound hole and becomes a little stronger behind the bridge. These changes are normal and do not affect the instrument. Should you detect patent or irregular changes in the soundboard curvature of your guitar, please contact us by email on service@lakewood.de.
The frets are uneven and worn
General
Frets are positioned in semitone intervals at calculated positions on the fret board. These positions determine the correct intonation of the instrument. The positions must obviously be correct from the start and they will remain unalterable thereafter. As a result, fret inaccuracy would hardly ever be applicable; instead it is more likely for an instrument to be inaccurate in regard to the octave position.
Frets are made of a copper, nickel and zinc alloy, sometimes referred to as ‘new silver’ which arose from the silvery gloss of the material, which does however not contain any silver.
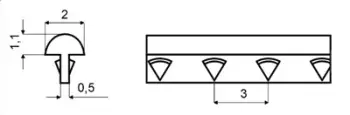
The fret wire used by Lakewood is of medium hardness and gauge as shown in the diagrams below. Also visible are the diamond-shaped barbs which help to retain the frets in their slots on the fret board. Frets are not glued so that they can be removed without damaging the fret board.
Assessing the fret surfaces
Frets have a curved surface to provide the strings with a well-defined contact point. This point will wear over time which will eventually lead to fret buzz or intonation problems. The more an instrument is played or the heavier the string gauge or the harder strings are fretted, the deeper the fret grooves will become. This will be acceptable for some time, until the grooves become such that a fret-dressing or replacement becomes necessary.
Dressing and replacement of frets
Both the dressing and replacement of frets must be handled by qualified technicians. You may gladly contact service@lakewood.de per email and please enclose a photograph on which the fret grooves are visible. We will then let you have an estimate of the repair costs.
Problems and Questions
- Individual frets are loose.
Answer: Please contact service@lakewood.de - Does fret-work fall under the Warranty?
Answer: This work is not covered by the warranty. - Would it be better to use very hard fret wire?
Answer: Not necessarily, harder fret wire leads to more string wear - Is it sensible to use higher or wider fret wire?
Answer: No, higher frets require a significantly more disciplined playing technique because strings hardly have any contact with the fret board. Broader frets can impede precise intonation.
One or more strings are rattling / buzzing
General
Please rest assured that a ‘rattle-free’ guitar has not yet been built and that we may expect the rules of physics to apply into the future.
Rattle occurs when vibrating strings make contact with the frets. The vibrations interfere with the string oscillation and lead to an impure sound. The energy in the string is partially absorbed by the rattle which leads to a quicker decay of the tone.
Causes of rattle (fret-buzz)
Rattling of strings may be due to a number of causes. Imprecise playing technique in either left or right hand often leads to string rattle. The fretting of a string (finger placement vis-à-vis the fret) may cause unwelcome vibrations.

On over-powerful strum with the right hand or the equivalent of a flamenco-like Apoyando can drive the vibrating string too close to the fret board.
These aspects of technique should be critically evaluated as they can either themselves or in conjunction with characteristics of the guitar be lead to string rattle.
Naturally, there are other causes of string rattle:
- Worn or faulty strings are the most common cause
- A string action unsuited to the guitarist’s playing style (see the section How can I measure and adjust the action of my guitar?)
- Uneven fret height (see the section on The frets are uneven and worn)
- Incorrect adjustment of the truss rod (see the section on How do I adjust the truss rod?)
- Excessive notch depth of the nut (see the section on How the nut can be checked)
Subjective perception
What may seem unacceptable string rattle to one player might not bother another and even be appealing to a third player who chooses this as his preferred musical ‘sound’. While we don’t intend to persuade any player to accept a rattling guitar it might be good to put one’s own perception into perspective. Strictly speaking, no guitar is rattle-free; indeed you can express and emphasise these sounds. To focus on these tones unduly might lead to an eventual loss of pleasure in the music.
Technical flaws must clearly be eliminated but, realistically, only in sync with improvement of the player’s technique.
Unwanted noise while playing
There may be unwanted vibrations which disturb the pure sound of the guitar. The definition, identification and treatment of these can be laborious but, if systematically addressed, can be successfully removed.
Vibrations while playing
Vibrations are always mechanical in nature. A guitar consists of numerous components, not all of which are secured by means of glue. These may loosen and cause unwanted vibrations at certain frequencies during playing. To pin-point such an item, you should proceed methodically, step by step, starting at the head stock.
Tuners (machine heads)
Check the functioning and positioning of the tuners. For more information, go to Care and maintenance of the machine heads (tuners).
Strings
Check if there is a string buzz/rattle. Refer to the sections on One or more strings are buzzing and How can I measure and adjust the action of my guitar in the FAQ section.
Correct stringing of the guitar
For the correct securing of strings at the tuners and the bridge, please see How do I restring my guitar in the FAQ Section.
Nut
Check the secure placement of the nut and the level of the nut grooves; see How the nut can be checked in the FAQ Section.
Frets
Check the fret ends for firmness and the fret surfaces for playing marks. See The frets are uneven and worn or Checking the fret ends in the FAQ Section.
Truss rod
Check the proper setting of the truss rod. See How do I adjust the truss rod in the FAQ Section.
Saddle
Check the surface of the saddle (bridge insert). Grooves in the material can give rise to unwanted vibrations and to address these, see How the saddle can be checked in the FAQ Section.
Braces
Check that the braces under the soundboard and in the body of the guitar are secure.
Pickup and Electronics
Built-in pickup systems can give rise to vibrations. Both cables and moving parts of the pick-up system may vibrate at particular frequencies. Read more on this in the FAQ section under Pickup system malfunction.
Le bouton d’accordage en bois glisse
Les boutons en bois comportent un palier métallique. La liaison entre le bouton et son palier peut se détériorer, provoquant des difficultés d’accordage. De plus, une fixation insuffisante entre le bouton et son palier peut engendrer des vibrations.
Dans ce cas, il est nécessaire de retirer le bouton de la tige de mécanique. Détends la corde d’au moins un ton et dévisse la vis de maintien située à la tête du bouton avec un tournevis adapté.
Fais attention en retirant le bouton de la tige à ce que les deux rondelles (une en métal et une en plastique) restent sur la tige — elles sont indispensables au bon fonctionnement de la mécanique d’accordage.
Retire ensuite le bouton et extrais le palier métallique, qui peut être refixé avec une petite quantité de « Superglue ». Attends quelques minutes avant de remonter la mécanique.
Si tu ne peux pas effectuer cette réparation toi-même, un bouton de rechange peut être obtenu auprès de nous à l’adresse : service@lakewood.de
Des cordes individuelles se cassent fréquemment
Il arrive parfois qu’un défaut du matériau des cordes provoque la rupture de certaines d’entre elles. Cependant, dans la plupart des cas, d’autres causes sont responsables. Vérifie ta technique de jeu et sois critique envers toi-même. Une attaque trop forte, surtout près du chevalet, peut solliciter le matériau de la corde au-delà de sa résistance.
D’autres causes possibles peuvent être de petites arêtes vives sur la sillet du chevalet, apparues avec le temps. Vérifie l’endroit où la corde entre en contact avec l’os. Si tu ressens une rainure prononcée ou une arête tranchante, retire le sillet et ponce légèrement la surface arrondie avec un papier de verre fin (grain 320 ou supérieur), afin que la corde puisse de nouveau glisser librement sur le sillet.
Comme les entailles sont généralement très petites, cette opération n’entraînera pas de changement perceptible de la hauteur des cordes.
A bridge pin is dislodged during a string change
Take care to kink the string slightly at the ball end before feeding it into the bridge slot and then push the bridge pin firmly home. Should the bridge pin lift during tuning, you may press it home with your thumb.
My guitar’s finish is scratched or dented
My high gloss finish has a milky sheen
The screw of the strap button has loosened
Cracks in the Body or Neck of the Guitar
The fret edges protrude or feel sharp
Lakewood Customshop 5
Comment commander une guitare Customshop?
Grâce à notre configurateur 3D, tu peux composer ta guitare de rêve, selon tes propres envies.
Le mieux est de te rendre d’abord chez un revendeur Lakewood près de chez toi – ou directement chez nous – pour essayer quelques guitares et voir quelles largeurs de manche, diapasons, formats de caisse et combinaisons de bois pourraient te convenir.
Si tu as des questions pendant la conception, n’hésite pas à nous contacter ou à t’adresser à ton revendeur de confiance.
Tu as ensuite deux possibilités :
Tu prends contact avec ton revendeur, tu lui envoies le PDF par e-mail ou tu lui fais parvenir une demande de commande directement depuis le configurateur.
Tu nous contactes directement, tu clarifies les derniers points avec nous et, s’il n’y a pas de magasin près de chez toi, tu peux commander ta guitare directement chez nous.
Merci d’utiliser dans les deux cas les formulaires de contact qui se trouvent dans l’aperçu du configurateur. C’est la seule façon de garantir que toutes les informations nécessaires sont bien transmises.
Sinon, nous pouvons aussi transmettre ta commande à un revendeur Lakewood de notre réseau.
La fabrication d’une guitare Custom Shop prend environ 3 mois – selon la complexité de ton instrument, et ce, quel que soit le mode de commande.
Puis-je choisir le bois de ma guitare Customshop chez Lakewood ?
Tout d’abord, tu peux avoir confiance : grâce à notre longue expérience, nous choisissons toujours des bois de très haute qualité pour ta guitare. Avec certains bois exotiques, la texture peut être très variable. Si tu attaches une importance particulière à la couleur et au veinage, tu peux volontiers nous appeler pour un conseil personnalisé ou venir directement à l’atelier pour choisir le bois de ta guitare. Il faut cependant prendre rendez-vous à l’avance.
Tu trouveras également sur notre site une galerie de bois vraiment exceptionnels que nous avons soigneusement sélectionnés et photographiés pour leurs propriétés techniques et leur beauté visuelle. Tu peux y choisir un de ces bois exclusifs pour la fabrication de ta guitare Customshop – et tu peux être sûr·e que cela donnera naissance à un instrument vraiment unique.
Est-il possible de modifier la forme et la construction d'une guitare Customshop ?
Cela dit, notre configurateur 3D t’offre une possibilité très complète de personnaliser ta guitare selon tes envies – tu y trouveras sûrement ton bonheur !
Et si tu as encore des souhaits particuliers, appelle-nous simplement ou écris-nous à info@lakewood.de.
Est-il possible de faire une incrustation personnalisée?
Nous réalisons aussi des incrustations spéciales sur demande – des repères de touche alternatifs à ta propre signature, jusqu’à des formes ou motifs complexes. En version unie ou en véritables œuvres d’art multicolores. Fabriquées en nacre, abalone, bois divers, or ou autres matériaux naturels.
Dans notre galerie photo, tu peux découvrir des exemples d’incrustations personnalisées sur les touches.
Tu es intéressé·e ? Tu as une idée précise ou seulement une vague inspiration pour quelque chose d’unique ? Alors envoie-nous un mail à info@lakewood.de ou appelle-nous !
On crée ensemble quelque chose de vraiment exceptionnel.
Et au fait : on peut aussi intégrer ton idée d’incrustation dans une guitare que tu possèdes déjà – qu’il s’agisse d’une Lakewood ou d’une guitare d’un autre fabricant.
Quelles sont les particularités d'un sapin aux noisettes?
Les « Haseln » sont des particularités visuelles du bois d’épicéa qui traversent les fibres en formant des marbrures perpendiculaires.
À ce jour, il n’existe pas d’explication scientifique précise sur l’origine exacte de ces figures.
Les tables en épicéa avec beaucoup de « Haseln » sont souvent plus dures que les tables en épicéa standard, ce qui permet de les travailler un peu plus fines – ce qui peut améliorer la réactivité de la guitare.
Leur valeur réside donc avant tout dans leur apparence unique.
Chaque table en épicéa « Hasel » est soigneusement sélectionnée et constitue une pièce unique – la base d’une guitare vraiment spéciale.
Bois, construction et autres matériaux 21
Quels bois sont utilisés pour les guitares Lakewood ?
Tu peux consulter l’assistant bois du Lakewood Customshop pour découvrir tous les bois que nous utilisons, leurs caractéristiques et leur utilisation dans la fabrication de nos guitares.
Tu y trouveras également des bois de tonalité exceptionnels présentés dans notre section galerie de bois.
Is the timber used by Lakewood from sustainable forestry sources?
How long is the storage and curing period of tone woods?
Can cured wood still distort?
What is the difference between AAA and AAAA tops?
AAAA tops are slightly more evenly grained, have an optimum relationship between weight and stability and are slightly stiffer. Consequently, they have better tonal potential.
What is the difference between AA and AAA Rosewood?
Does a cutaway affect tone?
Can the open-pore finish provide adequate protection for my guitar?
What are the advantages of a high-gloss finish?
By the way, satin finish and high-gloss varnishes are of an almost identical thickness.
Does the installation of a Pickup System alter the tone?
Quelles mécaniques sont utilisées par Lakewood ?
What material is used for the nut and bridge?
What is the composition and gauge of our fret wire?
How are Lakewood guitars lacquered?
Open-pored matt finish
This finish is standard for all instruments in the ‘Natural’ series.
Back, sides and neck receive two coats of polyurethane primer. The top receives a total of five coats of primer, each of which is rubbed down. After hardening, all surfaces are carefully rubbed down and then finished with two coats of polyurethane matt lacquer. Despite visible pores on the back, sides and neck, the lacquer surface is permanently sealed.
Closed pore satin finish
This is the standard finish for necks in the ‘Deluxe’ and ‘Premium’ series and is offered as an option for guitar bodies in the Custom Shop. All surfaces receive two coats of polyurethane primer. After the interim rub down, a transparent pore filler is applied which is hardened by means of UV light. This is followed by three coats of UV curing acrylic lacquer. Then all surfaces are carefully rubbed down and finished with two coats of polyurethane matt lacquer
High Gloss Finish
This is the standard finish for bodies in the ‘Deluxe’ and ‘Premium’ series and standard for the upper headstock surface of ‘Premium’ instruments. All surfaces receive two coats of polyurethane primer. After an interim rub down, a transparent pore filler is applied which is hardened by means of UV light. This is followed by three coats of UV curing acrylic lacquer. Then, after a further rub down, another three coats of UV curing acrylic lacquer are applied which are finely rubbed down and machine polished to the final high gloss finish.
Sunburst and Black Lacquer
With these finishes, the colour is introduced during the lacquering process into one of the coats. This is then protected by the subsequent coats of transparent lacquer.
Is there a difference in tone between matt and high gloss guitars?
Is there a risk of damage to the finish of a Lakewood guitar from rubber or synthetic materials used in guitar stands or wall brackets?
What is the Lakewood body-to-neck connection?
The neck is connected to the body by way of 2 bolts and the fret board is glued to the soundboard. In this way, a perfect, tight connection is established which may readily be opened, if necessary, for purposes of service.
What glue does Lakewood use?
What strings are Lakewood Guitars equipped with?
6-string guitars
D'Addario XS .012-.053 Phosphor bronze (.012 .016 .024 .032 .042 .053)
12-string guitars
D'Addario XS .010-.047 Phosphor bronze (.010|.010 .014|.014 .023| .008 .030|.012 .039|.018 .047|.027)
Baritone guitars
D'Addario XT .016-.070 Phosphor bronze (.016 .022 .029 .048 .060 .070)
Nylon string guitars (Crossover)
D'Addario XT Classical Hard Tension
Which pickup system does Lakewood use?
Which pickup systems did Lakewood use in the past?
1987-1990
Electronics by AER with volume, bass and treble attenuation by means of three pots located adjacent to the neck joint on the upper bout. Internal holder for a 9v battery. Transducer 091 by Shadow.
1991-1994
Electronics MK-2 by AER with volume, bass, mid and high frequency attenuation. Individual volume adjustment for each string. Operating console located below the waist on the upper side of the guitar. Externally accessible holder for 2 x 9v batteries, located adjacent to the endpin. Transducer Type 066 polyphonic in 80mm and 84mm length by Shadow.
1991-1995
Electronics MK-1 by AER with volume, bass and treble attenuation. Operating console located below the waist on the upper side of the guitar. Externally accessible holder for 1 x 9v battery, located adjacent to the endpin. Transducer Type 066 monophonic in 80mm and 84mm length by Shadow.
1996-1997
Electronics MK-3 by AER with volume, bass, mid and high frequency attenuation. Parametrically adjustable notch filter. Operating console located below the waist on the upper side of the guitar. Externally accessible holder for 1 x 9v battery, located adjacent to the endpin. Transducer Type 066 monophonic in 80mm and 84mm length by Shadow.
1998-2002
B-Band Core with internal battery pouch for 1 x 9v battery. No volume or tone adjustment.
B-Band Core + Microphone with internal battery pouch for 1 x 9v battery. No volume or tone adjustment.
B-Band New Frontier with volume, bass and treble attenuation. Operating console located below the waist on the upper side of the guitar. Internal battery pouch for 1 x 9v battery.
B-Band New Frontier + Microphone. Volume, bass and treble attenuation plus microphone blender. Operating console located below the waist on the upper side of the guitar. Internal battery pouch for 1 x 9v battery.
2003
B-Band A-3 with Volume, bass and treble attenuation. Operating console located below the waist on the upper side of the guitar. Internal battery pouch for 1 x 9v battery.
2003-2005
B-Band A-1 with internal battery pouch for 1 x 9v battery. No volume or tone adjustment.
2003-2005
B-Band A-6 with volume, bass, mid and treble attenuation. Parametric presence adjustment. Notch filter. Blend regulation for two pick-ups. Operating console located below the waist on the upper side of the guitar. Externally accessible battery holder for 1 x 9v battery adjacent to the endpin.
2004-2005
B-Band A-5 with volume, bass, mid and treble attenuation. Parametric presence adjustment. Notch filter. Blend regulation for two pick-ups. Operating console located below the waist on the upper side of the guitar. Externally accessible battery holder for 1 x 9v battery adjacent to the endpin.
2006-02/2012
Lakewood Sonic System, manufactured by Shadow. Volume and tone adjustment. Switchable Notch filter. Blend regulation for piezo-ceramic under-saddle transducer and magnetic fret board pick-up. Operating unit with battery located under sound hole rim.
2006-02/2012
Lakewood Classic System, manufactured by Shadow. Volume and tone adjustment. Switchable. Operating unit with battery located under sound hole rim.
2006-02/2012
Lakewood Mini Sonic System. Volume and tone adjustment. Operating unit with battery located under sound hole rim.
Further information on the Sonic System and the B-Band Systems can be found in the chapter Pickup systems we fitted in the past.
Entretien, inspection et stockage 21
Comment entretenir les surfaces vernies de ma guitare ?
How do I care for the unvarnished fret board of my guitar?
How do I restring my guitar?
Guitar strings are secured by means of bridge pins which fit into the slots of the bridge at one end and by way of a hole in the shaft of the machine head (tuner) at the other end. The quality of these securing parts is fundamental to the tuning integrity of the guitar.
Securing strings at the bridge end
The strings are inserted into the slots of the bridge by means of suitable pins. Kink the ball-end of the string slightly before inserting it into the slot. Then press the pin firmly home into the slot, taking care to face the channel of the pin in the direction of the sound hole.
Now, by tightening the string, the ball-end will be wedged by the pin against the bridge plate on the underside of the sound-board.
Should the pin at any stage move upward, simply push it gently (but firmly) back home. The pins are not unduly forced so that they may be removed freely when the string tension is released.
Securing strings at the machine heads
Guitar strings are made longer than required and it is not advisable to wind the entire length onto the tuner shaft. With flat headstocks, strings are easily accessible while slotted tops make this somewhat more difficult.
With flat headstocks start with the e-1 string and put 2 loops onto the tuner shaft winding from inside to outside.
Take care to hold the string tightly and wind from the bottom of the shaft towards the top end.Then thread the string through the hole again.
This second threading of the string will prevent slippage during the tuning process. It is only required for the unwound e-1 and b-2 strings.
Now use a string winder to tighten the strings. The final tension is only decided when all strings have been tightened. The tightening sequence is as follows: e-1, b-2, g-3, E-6, A-5 and lastly D-4. Although this sequence has been proven, it is not obligatory.
The wound g-3, E-6, A-5 and D-4 strings may be passed through the hole in the shaft only once and then clipped off.
When all strings have been fitted, you can proceed with tuning. Since all strings will settle at both ends, stretch each one after the initial tuning, by pulling gently. The tuning will flatten and a second pass will be needed. This may be repeated a few times, as required, until the strings hold their pitch. (Tip: whenever tuning your guitar, gently stretch the strings first; they may have slipped overnight for climatic or temperature reasons and you may find that they are in tune or nearby after the stretch!).
Lastly, you may clip excess string ends as close to the tuner shaft as possible, to avoid injury.
Strings may remain a little unstable in the first few days after fitting but will then settle and hold their pitch.
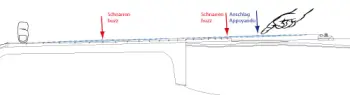
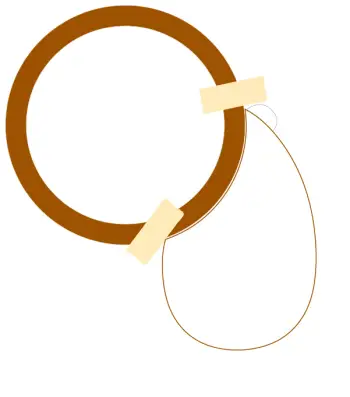
With slotted headstocks insert the string through the headstock slot, pass it around the shaft and back through the slot again from behind. Now stick the string end through the slot again (see diagram below)
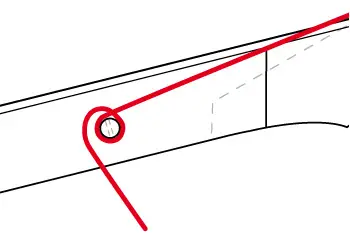
before finally threading it through the hole.
You may want to thread the unwound strings through the shaft hole a second time to secure them more firmly, as described above for flat headstocks.
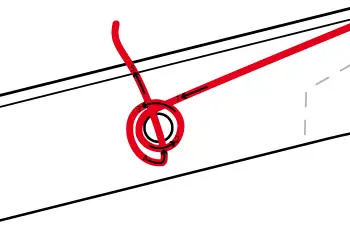
Now the strings can be tightened by means of a winder to a point where they are firm in the nut and on the tuner shaft, albeit not yet at concert pitch. As with flat headstocks, strings are tensioned in the following sequence:- e-1, b-2, g-3, E-6, A-5 and lastly D-4. All strings should wind onto the shaft toward the outside of the headstock (see diagram).
 Now tune and stretch the strings as described above for flat headstocks. Finally, excess string ends can be clipped, taking care not to damage the wood with steel tools.
Where should I store my guitar?
What should I do when undertaking air travel with my guitar?
Y a-t-il des consignes particulières à respecter lorsque j'emporte ma guitare dans d'autres zones climatiques?
Les guitares Lakewood sont fabriquées dans des conditions climatiques contrôlées, ce qui les rend relativement résistantes aux variations d’humidité.
Cependant, des conditions extrêmement sèches ou humides peuvent quand même affecter les matériaux naturels et la structure de la guitare.
Dans ces situations, le mieux est de garder ton instrument dans son étui.
Associé à un Humidipak de D’Addario, cela permet de maintenir un climat idéal pour ta guitare à l’intérieur de l’étui.
Is damage caused by extreme humidity or temperature covered by the Warranty?
Est-il utile d'utiliser des humidificateurs ou des déshumidificateurs ?
Pour commencer, un hygromètre de bonne qualité suffit. Il te permettra de savoir si l’air de ta pièce a réellement besoin d’être humidifié ou déshumidifié.
Pendant la saison de chauffage en hiver, l’air ambiant peut devenir très sec. Si c’est le cas, nous recommandons d’utiliser un humidificateur ou de conserver ta guitare dans son étui avec un Humidipak de D’Addario.
Nous conseillons les humidificateurs de la marque Venta, comme le Venta Airwasher LW25.
Il est important d’adapter l’appareil à la taille de la pièce ! Et surtout : surveille toujours le taux d’humidité avec un hygromètre pour éviter un excès d’humidité.
Dans les pièces très humides, l’utilisation d’un climatiseur et/ou d’un déshumidificateur peut aussi être utile.
Vaut-il la peine d'acheter un hygromètre?
Attention : la plupart des hygromètres – qu’ils soient analogiques ou numériques – ont des tolérances élevées et peuvent être imprécis.
C’est pourquoi il vaut vraiment la peine d’investir dans un bon hygromètre.
Should the string tension be reduced if the guitar will be out of use for some time?
How can I measure and adjust the action of my guitar?
General
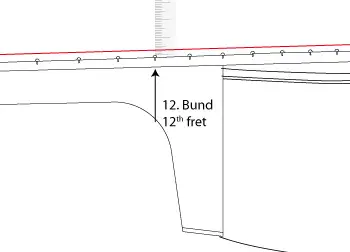
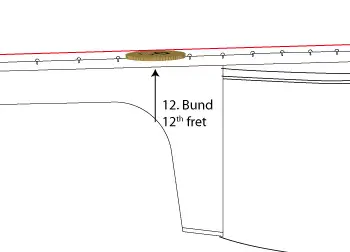
The gap between the strings and the frets is referred to as ‘the action’. Note that this is not the distance between the strings and fret board. Also, in determining the action, the gauge of the strings is not relevant. Essentially, it is the clear gap between the strings and the frets which is generally measured at the 12th fret for the e-1 and E-6 strings.
The action plays a role as to the playability of the guitar, but also influences playing dynamics. For this reason, generally applicable parameters are not mandatory – one size does not fit all; action is a personal choice.
At Lakewood we endeavour to set up our guitars so as to suit the preferences of the majority of Players.
Measuring the action
Important: before altering the action, check the neck with regard to the truss rod which may require adjustment.
See more on this at How to adjust the truss rod?
For measurement of the action, you will need a short ruler - but a 20 and 50 Eurocent coin will do the trick too!
As mentioned, the action is measured as the clear gap between string and fret at the 12th fret. For average playing dynamics and light gauge strings (.012-.053 inch) the generally accepted values are 2,0mm for the e-1 string und 2,5mm for the E-6 string. These gaps can either be determined by way of a ruler
or very simply by means of suitable coins.
For the e-1 and an action of 2,0mm the 20 Eurocent coin is perfect and for the E-6 string with an action of 2,5mm, the 50 Eurocent coin does the job. If you can just slide the relevant coin into the gap, you will have achieved a 2,0 – 2,5mm action.
Adjusting the Action
Should you want a lower or higher action, this will be subject to certain limits.
The strings require room for unimpeded oscillation and this will restrict your desire for a very low action. This may be depicted graphically as follows:
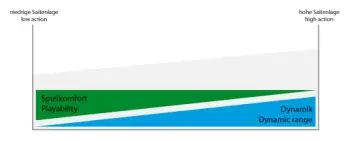
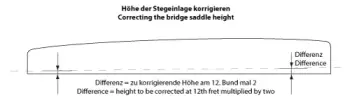
So, to adjust the action, the saddle height will need to be altered. This is achieved by adding to or subtracting from the bottom of the saddle insert. This difference is calculated at twice the value to be added to or subtracted from the gap at the 12th fret.
Adding to the saddle height can be achieved by means of a suitable shim to be placed on the pickup element.
Lowering the saddle is done by carefully removing material from the bottom of the saddle insert. In doing so, great care must be taken to retain the absolute evenness of the bottom surface. Failure to do so will impact on the acoustic qualities of the guitar and/or its performance via the pickup. Take the advice of a technician if you are unsure about this procedure.
Should a materially higher action be required, this may impact the bridge, depending on type and geometry. The saddle insert should not protrude by more than 6mm over the surface of the bridge. A higher saddle insert would result in too acute an angle for the strings.
Comment régler la tige de réglage (truss rod)?
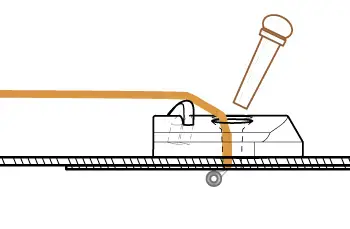
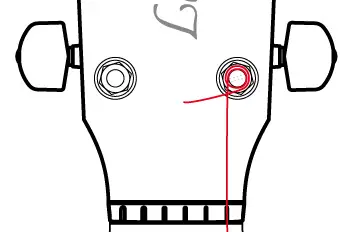
Les guitares Lakewood sont équipées d’une tige de réglage située sous la touche. L’écrou de réglage hexagonal de 5 mm est accessible par une ouverture dans la barre de renfort entre la rosace et la touche. Le réglage de la tige de réglage influence la courbure (le relief) de la touche. Lorsqu’elle est correctement ajustée, la touche présente une légère courbure concave. La tige de réglage sert à stabiliser le manche et la touche, mais ne doit pas être utilisée pour régler la hauteur des cordes (action).
Pour régler la tige de réglage, tu auras besoin de :
Un capo
Une clé Allen de 5 mm à bras long
Une cale d’épaisseur (feeler gauge) de 0,5 mm
Procède comme suit :
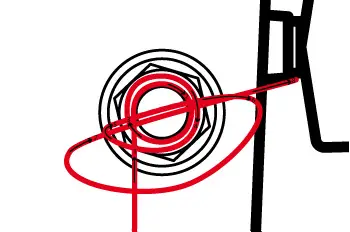
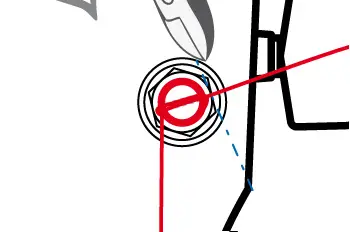
Place le capo sur la première frette.
Appuie sur la corde de mi grave à la 14ᵉ frette.
Insère la cale d’épaisseur à la 7ᵉ frette entre la corde de mi grave et la frette (voir image 2).
A. Si la cale s’insère parfaitement dans l’espace, la tige de réglage est bien réglée.
B. Si l’espace est trop étroit, il faut desserrer la tige. Commence par un quart de tour (dans le sens antihoraire), puis vérifie à nouveau avec la cale. Répète si nécessaire.
C. Si l’espace est trop large, il faut resserrer la tige. Commence par un quart de tour (dans le sens horaire), puis vérifie à nouveau. Répète si nécessaire.
Si tu n’es pas sûr(e) de vouloir régler la tige toi-même, n’hésite pas à nous contacter par e-mail ou par téléphone !
Comment puis-je régler la système L.R. Baggs Anthem
Le système d’amplification L.R. Baggs est composé de deux sources. Le capteur piézo «Element» installé sous le sillet en os est complété par le micro acoustique «Tru · Mic» localisé dans le corps sous le chevalet. Ces deux sources de haute qualité rendent fidèlement le son naturel de votre guitare, ni plus, ni moins.
1. Mixeur (mix entre le capteur piézo et le micro acoustique)
Lorsque la molette du mixeur est tournée vers le manche, c’est le micro acoustique «Tru · Mic» qui porte la plus grande partie du signal tandis que le capteur piézo «Element» ne prend en charge que les plus basses fréquences. En tournant la molette vers le corps, vous n’entendrez que le signal capté par le micro piézo «Element».
2. Inverseur de phase
Le bouton d’inversion de phase renverse la phase du signal de sortie par rapport à la corde en vibration.
En général, l’une des deux positions du bouton donnera soit l’impression d’améliorer la qualité du son et/ou de réduire le larsen. Nous recommandons de vérifier à chaque utilisation du système quelle position donnera le meilleur résultat en fonction des circonstances.
3. Réglage du volume
Tourner la molette en direction du manche pour augmenter le volume et vers le corps pour le réduire.
4. Contrôle du niveau de la batterie et sac de batterie
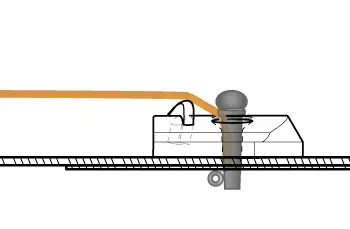
Le système Anthem de L.R. Baggs est alimenté par une pile-bloc de 9V. Appuyez sur le bouton (4) pour contrôler le niveau restant de la batterie: une pile chargée illuminera les 5 LEDs disposées sur la face supérieure de l’amplificateur (4.1), ce qui permet une autonomie moyenne de 170 heures de jeu. Deux LEDs allumées indiquent une autonomie restante d’environ 8 heures. Si une seule LED s’illumine, il est recommandé de changer la batterie.
La batterie est logée dans un sac près du talon du manche dans le corps de la guitare (voir illustration 2).
Pour changer la batterie, vous devrez détendre les cordes afin de pouvoir glisser une main dans le corps de la guitare pour accéder au sac de batterie. Lors du changement de batterie, veillez à ne pas tirer sur les câbles de connexion. Pour augmenter la durée de vie de la batterie, pensez à toujours retirer la prise jack de la guitare pour ne pas laisser inutilement l’amplificateur sous tension.
La vérification du niveau de batterie peut aussi se faire sans brancher la guitare à une prise jack.
5. Affiner le niveau du micro
Le bon réglage de ce contrôle est vital pour le système Anthem. L’affinage du niveau du micro s’effectue par le potentiomètre (5) à l’aide d’un tournevis fin à tête plate.
Branchez votre guitare sur un ampli et ouvrez complètement le micro en tournant la molette du mixeur (1) à fond en direction du manche. Affiner le signal tout en jouant: si le son est terne et manque de clarté, augmenter le niveau du micro en tournant le potentiomètre dans le sens horloger. Si le son est trop aigu et/ou trop sensible aux bruits mécaniques (toucher, frottements) de la guitare, réduisez le signal en tournant le potentiomètre dans le sens anti-horloger. Le son amplifié devrait être bien équilibré et restituer fidèlement le son naturel de votre guitare.
Note: Un réglage d’usine correct et neutre a été effectué sur votre guitare Lakewood. N’envisagez de modifier le réglage du micro qu’après quelques essais et seulement si vous estimez qu’une modification personnelle est indispensable.
What is the Operating Duration of the L.R. Baggs Anthem Pickup System?
How do I install the second strap button?
You'll find a manual for this in the download area.
How the nut can be checked
General
The nut is located at the top end of the fret board at the point where the fret board joins the head stock. The purpose of the nut is to position the strings in the correct spacing from each other from the fret board edge and at the correct height above 1st fret. The precision of the nut is a prerequisite for perfect playability and comfortable action, especially with unfretted or ‘open’ strings. The notches guide the strings without choking them during tuning.
Checking the notches
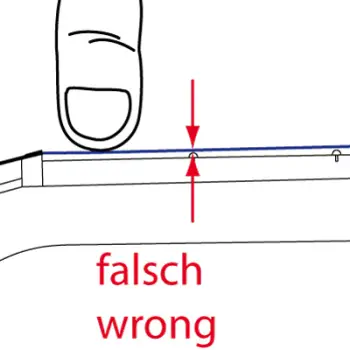
Strings must be at the correct clearance above the 1st fret. To determine this, fret each string with your ring finger at the 3rd fret and simultaneously lightly tap the string with your index finger at the 1st fret, checking the gap between string and 1st fret (see diagram). The gap should be the thickness of a business card. After a while your eye will focus more readily on the affected area and you will be able to assess the gap more easily.

Correcting the nut
For technical reasons, a correction of the nut will not be possible for you. However, should your guitar’s nut require adjustment, please contact service@lakewood.de for assistance. Unlike a bridge insert, nuts cannot be delivered for fitment by the player since each one is uniquely finished for its guitar. For this reason, the correction or exchange of a nut requires a luthier‘s expertise.
Problems and questions
- A deviation is detected when checking the nut.
Answer: please contact service@lakewood.de - The nut has come loose during restringing.
Answer: The nut is simply held in place by means of a small amount of wood glue. You can refix it into the correct position by means of a drop of glue, taking care to place it centrally and hard against the fret board. - What is the material from which a guitar nut is made?
Answer: Argentinian bleached cattle bone. - What can be done about strings which catch in the nut during tuning?
Answer: depending on string gauge and composition, strings can catch in the nut grooves. This can be reduced by rubbing the offnding groove with graphite (pencil lead). - Some strings rattle when played open. What has happened?
Answer: Over time, the grooves have been deepened due to repeated tuning. The nut must be repaired or replaced. As the nut is wearing part, this is not covered by the warranty.
Comment vérifier le sillet de chevalet
Généralités
Le sillet est inséré dans une fente inclinée vers l’arrière sur le chevalet, qui sert également d’ancrage aux cordes. Il transmet l’énergie des cordes au chevalet, lequel met ensuite la table d’harmonie en vibration. C’est ainsi que le processus d’oscillation est initié – un processus dont la précision du positionnement du sillet est essentielle pour garantir la qualité sonore.
La hauteur du sillet peut être ajustée afin d’adapter la hauteur des cordes (action).
Le sillet doit s’ajuster parfaitement dans sa fente, sans jeu ni coincement.
Les cordes passent sur le sillet à intervalles réguliers, et il est normal que de légères rainures se forment au fil du temps aux points de contact.
Ces marques peuvent être corrigées à l’aide d’un papier abrasif très fin (grain 320–400). Pour cela, détends les cordes au niveau du chevalet et retire le sillet en le pinçant entre le pouce et l’index. En tenant le sillet d’une main, ponce doucement la surface courbée de l’autre main jusqu’à ce que les rainures disparaissent. Pour une finition lisse, tu peux polir la zone concernée avec un peu de dentifrice (la marque est à ton choix !).
Enfin, remets le sillet dans sa fente, en veillant à ce que l’extrémité la plus haute soit du côté des cordes graves.
Questions
Quel matériau est utilisé pour les sillets ?
Réponse : Les sillets Lakewood sont en os.
Puis-je utiliser d’autres matériaux comme le Tusq, le Corian ou le laiton ?
Réponse : Oui, à condition que le nouveau sillet s’adapte parfaitement à la fente du chevalet.
Puis-je obtenir un nouveau sillet pour ma guitare ?
Réponse : Oui, tu peux en commander un nouveau en écrivant à service@lakewood.de
Care and maintenance of the Machine Heads (tuners)
The tuners are fixed to the head stock. Closed-housing tuners are secured by way of a 10mm hexagonal nut which holds the bearing of the tuner post against the head stock top, while the housing is held to the back of the head stock by way of a small screw. These fastenings can loosen over time. To retighten the hex nut, use a 10mm open spanner in a clockwise direction. The strings do not need to be loosened. For the small wood screw holding the housing, a fine Philips screwdriver is needed. Neither of these fastenings must be over tightened. Simply ensure that the tuner housing is secure and does not move.
Tuners without a housing (open) are secured by a bearing tube. By applying lateral pressure, check whether this tube is loose. If so, remove it with your fingernail. Then apply a small drop of domestic glue and re-insert it into position.
On guitars with a slotted head stock, the tuners are positioned by way of holes in the flanks and middle of the slots which obviate the need for metal bearings.
The base plate for open tuners are fixed to both flat and open head stocks by way of 2 small Philips wood screws. Check these periodically and tighten gently, if necessary. The wood screws should always be in contact with the tuner base plate.
The knobs of open tuners are held in place by means of glue. The bond can be checked by tuning the string; if loose, it will be difficult or even impossible to tune the string. The knob will turn on the pin and may even be pulled off. Applying a minimal amount of ‘superglue’ into the hole, the knob can be replaced onto the pin. Wait a while before using that tuner again.
The knobs of tuners with housings are attached by screws which can be tightened by means of a Philips screwdriver. The tightness of these screws determines the ease of operation of the tuner. If over tightened, the tuner will be hard to turn; if it is too loose this may lead to vibration noise and cause poor tuning stability.
Wooden tuner knobs have a metal sleeve which could loosen. This may lead to difficulty in tuning the affected string and may also cause vibration noise. In this case, it will be necessary to remove the knob from its sleeve. Tune the string down at least one full tone and loosen the screw at the outside of the tuner knob with a suitable screwdriver. Take care, when removing the knob, that the two washers of metal and plastic respectively, remain on the tuner pin. These washers are essential for the proper functioning of the tuner. After removing the tuner knob, separate the metal sleeve, apply a drop of ‘superglue’ and then reassemble the knob and sleeve.
Chromed and gilded tuners are made in one piece and have no sleeve.
How do I apply a Pickguard?
Mesure et optimisation de la justesse des octaves
Généralités
La justesse des octaves est déterminée par l’intonation des cordes à la 12ᵉ frette de la guitare. La précision de cette intonation détermine la jouabilité de l’instrument : si elle est incorrecte, la guitare ne peut pas être accordée précisément. Cependant, la technique de jeu et les tolérances de fabrication des cordes ne permettent qu’un optimum théorique. En pratique, il ne faut pas s’attendre à une justesse d’octave parfaite.
C’est bon à savoir — mais pas de panique !
Mesure et évaluation
La mesure s’effectue en comparant l’harmonique naturelle et la note frettée à la 12ᵉ frette.
Pour produire une harmonique, pose légèrement le bout du doigt sur la corde, pince la corde, puis retire ton doigt simultanément. Les harmoniques apparaissent uniquement à certains points précis de la corde, comme ici au milieu exact, soit à la 12ᵉ frette.
Fais attention à ne pas appuyer trop fort ou de côté sur la note frettée.
La fréquence des deux notes doit, idéalement, être identique. Avec une bonne oreille, tu pourras percevoir de petites différences, mais pour une évaluation plus précise, utilise un accordeur. Tu pourras ainsi mesurer la justesse et les écarts de chaque corde. Des écarts de ±5 cent sont acceptables.
Note la différence entre l’harmonique et la note frettée pour chaque corde, et répète la mesure plusieurs fois pour obtenir une moyenne indépendante de ta technique de jeu.
Exemple de valeurs mesurées :
e-1 : –5 cent
b-2 : +1 cent
g-3 : ±0 cent
D-4 : –5 cent
A-5 : –5 cent
E-6 : –1 cent
Cela indique qu’une correction est nécessaire pour les cordes b-2 et E-6. Comment y remédier ?
Optimisation
Revenons au chevalet : il suit la courbure de la touche et est environ 1 mm plus bas du côté aigu que du côté grave. Le sillet en os inséré dans le chevalet fait environ 2,5 mm de large, et les cordes passent sur son arête centrale.
Pour corriger l’intonation d’une corde, il faut déplacer le point de contact de cette corde sur le sillet. Si ton accordeur indique une déviation positive (+ cent), déplace le point de contact vers l’arrière, c’est-à-dire loin de la rosace. En cas de déviation négative (– cent), déplace le point de contact vers la rosace.
Tu te demandes peut-être si de si petits ajustements peuvent vraiment faire la différence : oui ! Par exemple, pour une déviation de +10 cent, il suffit de déplacer le point de contact d’environ 0,75 mm vers l’arrière.
Les outils nécessaires à cette opération ne sont pas toujours disponibles. N’hésite pas à contacter service@lakewood.de
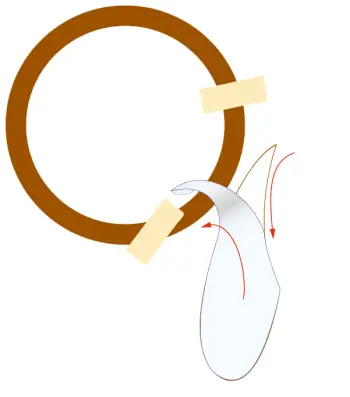
How do I apply the new transparent Lakewood Pickguard?
Tutorial Video
Easiest of all will be for you to take a moment to view our tutorial-video in which we provide a step-by-step procedure for you to apply the pickguard onto the guitar soundboard without any complication.
Application of the pickguard in 4 easy steps
Step 1
First clean the soundboard surface with a cloth (e.g. the Lakewood microfiber cleaning cloth). If necessary, use a cleaning agent which will not leave any greasy, oily or silicone residue on the surface which must ideally be dry and dust-free.Place the pickguard onto the soundboard without removing the protective film. In this way it will not yet adhere and can be positioned freely. Find the desired position by sliding back and forth. Optically important is to ensure that the concave section of the pickguard fits precisely along the soundhole rosette line. For Lakewood guitars this radius fits perfectly. Should you have another model, this must be achieved by approximation.
When you have determined the correct position, mark two reference points (preferably the two "corners" of the pickguard as pictured) by way of sellotape. This will enable you to return to the same position later.
Step 2
Take the pickguard and, using the tab, remove the protective film from approximately half of the pickguard.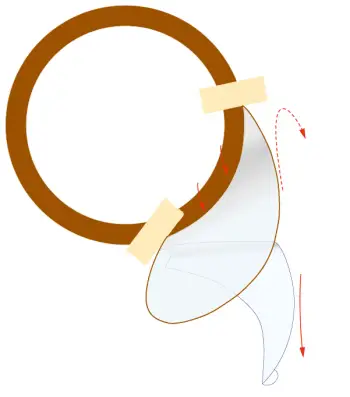
Step 3
Now place the corners of the pickguard against the taped reference points onto the soundboard surface, starting with the "sharper end". Keep the other end of the pickguard clear, without kinking it. When it is in position, press the pickguard onto the soundboard surface while simultaneously removing the rest of the protective film. Guard against air pockets and small dust particles.
Step 4
Now you have completed the application of the pickguard.Should air pockets have persisted, work these carefully away to the edge with your finger, taking care not to dent the delicate soundboard surface.
Lastly, remove the marker tapes from the soundboard and once again clean the surfaces, checking whether all has been correctly done. If not, don’t despair – you can simply repeat steps 1-4.
Note
Note: despite due care on our part, the pickguard cannot be guaranteed for complete UV-transparency. Over time slight wood coloration differences may arise on the affected area which means that there may be a lighter colour tone where the pickguard was placed.
Technical Data
We would like to furnish you with the following data for the pickguard as provided by the supplier. These are given without any warranty.
Lakewood Guitars GmbH " Co. KG does not take any liability for possible lacquer intolerances.

Optical property
| Property | Test Method | Result |
|---|---|---|
| Transmittance (400-700nm) | Transmittance tester | Ave. 94 |
| Transmittance (400-700nm) | Spectrophotometer | Ave. 94 |
Physical property
| Property | Test Method | Result |
|---|---|---|
| Pencil hardness | 500g (ASTM D3363 / JIS K5600) | 8H |
| Surface abrasion | Steel wool (#0000) at 750g/cm3 (ASTM D1044) | No scratch |
| Adhesion | 10x10 sections (ASTM D3359 / JIS D0202) | 100/100 |
Note: Values assigned represent the results of tests conducted and are not standard values guranteed.
Chemical resistance
| Property | Test Method | Result |
|---|---|---|
| Ethanol | The chemical was deposited on the surface of the coating and allowed to stand for 30 minutes at room temperature. Then the chemical was wiped off and the coating sample evaluated. | No remarkable change. |
| IPA | No remarkable change. |
Note: The change of the optical and physical charachteristic between before and after test was measured.
Status: August 2016

Visite de l’atelier
Une fois par mois – toujours l’avant-dernier vendredi – nous ouvrons nos portes aux visiteurs. Entre 10h et 16h, tu peux venir nous voir. La visite guidée commence à 10h30 et dure environ 2 heures.Découvre en direct comment nos guitares sont fabriquées, fais connaissance avec les bois de résonance et pose tes questions sur place. Tu peux essayer des guitares, acheter des guitares et des accessoires ou simplement demander conseil pour le Customshop.
La participation est gratuite, les places sont limitées à 18 personnes.
Prochaine date avec des places disponibles : 24 juil. 2026 Sign up now